UPDATE: replaced all the images – sorry about them being broken after moving to a new server. They’re clickable now for an enlarged view.
UPDATE (2014-01-05): came across an original D70s repair manual with highly detailed disassembly instructions, part numbers, etc. You can download it here as a PDF. Seems to be a safe download, but the usual precautions about content from unknown sites apply.
My D70s recently developed the dreaded CHA error, refusing to recognize any perfectly fine CF cards. A closer inspection revealed that one of the pins was pushed back… straightening a bent pin is fairly easy with the right set of SMD tweezers and a little patience, but if it is pushed back things become more difficult, effectively requiring a little disassembly.
Please keep in mind that the following instructions WILL VOID YOUR WARRANTY. Only attempt this if you are comfortable with working on fragile parts, have a lot of patience and the right tools. Do not lose any parts. The screws are NOT all identical, so arrange your workplace to make sure you know EXACTLY which part belongs where.
Tools required:
- tweezers (the smaller the better, I like my straight-tip SMD tweezers although the shap tip isn’t really perfect)
- PH00 tip screwdriver
- good light
- patience
Unfortunately, I can’t help with any part numbers, but the comments indicate that they are usually available at Nikon service facilities (where an informal description should suffice to get the right part).
Step 0: Preparations
Make sure you have a clean work space. This is not the right time to be drinking Coke or eating chips. Make sure you remove the battery. Remove the lens and put the protective cap in place.
Step 1: Back panel removal
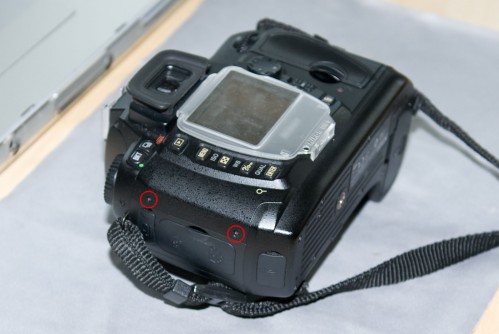
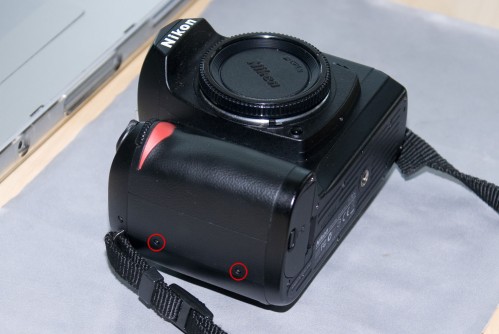
The back panel is held in place by four screws on the left and right side of the camera body. Remove them all and set them aside.
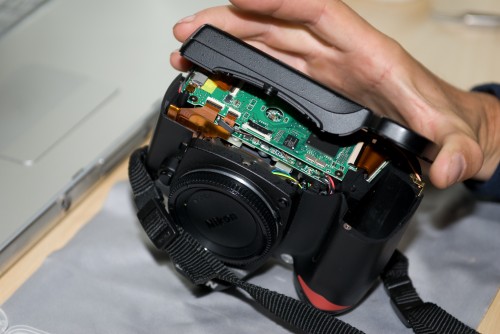
Now, gently lift off the back panel. I used the CF cover flap to pull on one side. Be careful, there is one connecting ribbon cable on the bottom that you do not want to damage.
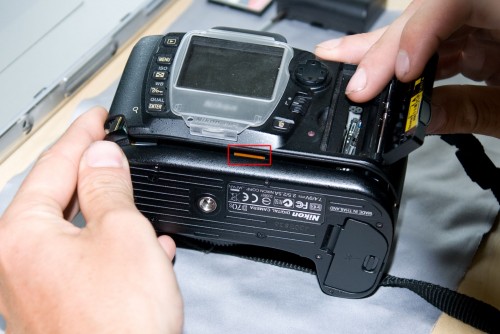
To disconnect this cable, carefully slide the black part of the connector downwards, towards the cable. The best way to do this is by using the tweezers on the side parts of the connector.
This is what the connector looks like when closed:
And here it is open:
Set the back panel aside in a safe place.
Step 2: Bottom panel removal
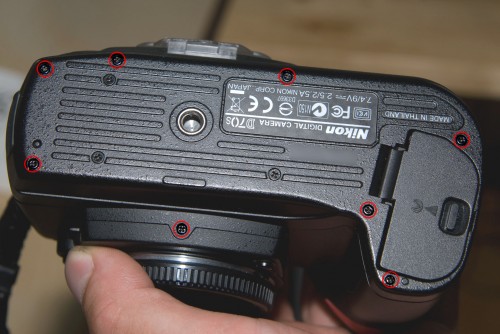
The bottom panel is held in place by 8 screws. Some of them have different sizes, so make sure you’ll know which one goes where when you put everything back together.
Now lift off the bottom panel. It doesn’t have any connectors, so it should come off quite easily.
Step 3: CF Subpanel removal
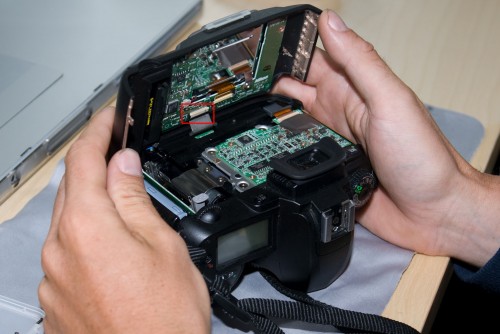
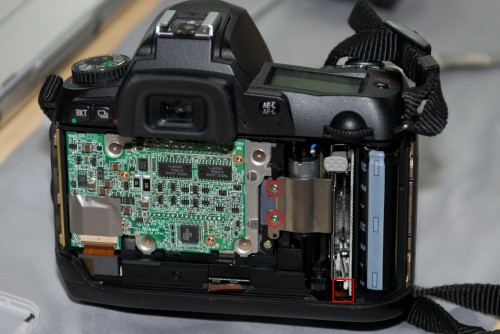
The CF subpanel is connected to the rest of the camera through one ribbon cable. Unlike the back panel, this connector has a black flap to hold the ribbon in place. Gently flip the black part up to release the cable, and then pull it out of the connector.
Next, remove the two sliver screws holding the subpanel in place.
Pull out the CF subpanel, it should come off very easily. Note that there is a small copper sheet below the bracket that held it in place, do not lose or damage this part.
Step 4: Fixing the pins
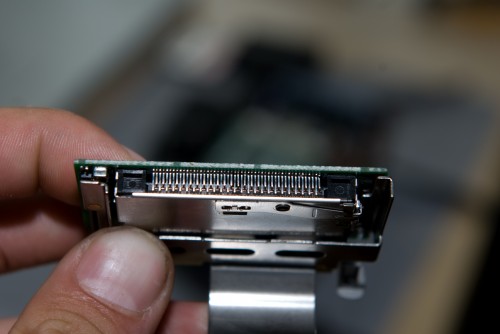
Now that you have direct access to the reverse side of the CF receptable, use the tip of very fine tweezers – or a very small screwdriver – to push the pins back into arrangement. Here is the bottom part after realigning:
It is also much easier to straighten any bent pins with the subpanel removed.
Step 5: Testing and reassembly
once you are confident that the CF receptable works (try it with a CF card), put it back in place. If it doesn’t slide into its position easily, there is a cable at the bottom that may be getting in the way. Don’t force it.
Reconnect the CF subpanel. Make sure the black flap on the connector is ‘up’, then slide the ribbon fully into the connector and close the flap. Take your time, if you damage the ribbon you’ve converted your almost-repaired camera into a paperweight.
Replace the silver screws. Did you take care of that copper sheet?
Reconnect the back panel. This takes a lot of patience, because there isn’t much room to work with and the sliding connector is a bit of a pain without expert tools. Make sure the black locking part of the connector is ‘open’, slide the cable fully into the connector, and use tweezers to push the cable as well as the lock into the base of the connector. Again, don’t rush. This can take a while.
Now the camera is sufficiently connected for testing. Put the back panel back in place, and insert a CF card and a battery. You’ll have to hold the battery in place, but the camera should turn on and work as expected. Test all the buttons on the back panel. The first time I tried, the back panel connector was slightly misaligned and only the left/right part of the rocker switch didn’t work.
If all works well, turn the camera back off and screw the back panel in place.
Finally, replace the bottom panel. Make sure you’re using the right screws in each position.
Step 6: Go out and shoot great pics!


Comments
105 responses to “D70s Camera Repair How-To”
Excellent and informative article on access the pins on the D70 CF port. Fortunately, I don’t have any problem but if I did, your article would have been very helpful
Thanks for writing the procedure. I tried it and found that the pins were not misaligned or bent in any way. If you look down into the CF slot you see pins of different lengths, that is normal.
On reassembly I got -E- meaning no memeory card detected.
While dissambled I cleaned the pins and CFcard with chemical contact cleaner suppsoedly safe for cameras, but not this tiny application. I believe that is the cause for non reading the card and I will reclean with spray cleaner.
I advise cleaning the card and pins first using specialized method for this application, especially if visual inspection through the card slot reveals no obviously bent pins. The pins in the center are supposed to be longer than surrounding pins, and the pins on the ends are longer and shorter than the others.
No more Nikon for me.
THIS IS A LIFE SAVER!!! I’m currently in Russia and my son must have bent one of the pins…. problem is I can’t seem to unscrew the screws… are they very difficult to unscrew? I was able to find very small screwdrivers but I haven’t yet been able to turn any of them…. maybe the tools I have aren’t the best… if you can e-mail me a response that would be greatly appreciated… as internet here is very sporadic THANKS
Where do you find the part if you need to replace the card holder assembly?
Great instructions! Just need the part now.
thank you very much
I used your procedure to open the camera and check the card-reader since I often have the CHR error on my D70.
No pins were misaligned. I cleaned the pins by spraying a contact spray in a flash card and afterwards inserting and rejecting the flash card multiple times in the card-reader slot. Further I dried the reader and the card-holes with a hair-dryer (!! not hot!!) (. In fact I did not really need to open the camera for this cleaning procedure).
First time I did remount the camera: no images on the backplane. I must have misaligned the backplane flat-cable. Afterwards I reinserted that cable and then it worked fine.
In any case I have a easier procedure for remounting the backplane: disconnect the backplane cable on the other side (it is connected on the bottom of the camera). But be very careful, this is another type of flat-cable connector: the black part rotates open and you then can easily remove the cable.
By removing the backplane flat-cable on the other side, you can first insert the cable at the toughest side, namely the backplane side. Afterwards you insert it at the other side. This way of remounting is a lot easier.
I cannot add a picture of this, since I do not have a second camera.
If you are not experienced in this stuff, you should not start this procedure.
I did it and finished it with success, but I would not try it multiple times..
I replaced the whole circuit, put it back together and it worked great. Then I gave it to my friend and the moment she touched it, it worked no more. I have disassembled it again to check on connections. All seemed to be connected, but I redid them again. Still nothing. Any suggestions, or do I have a paperweight?
I’ve been having major problems with the “File does not contain an Image” error with my D70. After trying a few different cards, reformatting, etc… to no avail I did the above instructions just to reseat all of the ribbon cables.
I’ve taken about 1000 pictures here in my studio with no problems so far, so wish me luck. Thanks so much for the detailed-walkthrough. It was very helpful.
Also, I would definitely recommend Patrick B’s method above and take the bottom panel off and removing the ribbon cable first (and reattaching last) to the back panel. It was just too difficult for me to reattach it as Setphen described.
Otherwise, all seems to be well. Definitely watch out for that thin ribbon cable in the cavity where the card reader is. When you try to stick the card reader back in, it will get hung up (I ended up taping it to the side to keep it out of the way).
Also, when you put the card reader module back in, I would go ahead and attach the ribbon cable to it, fold it against it self while you position the card reader in cavity, the use some tiny pliers to finesse the ribbon out of the slot. I tried attached the ribbon to the card reader once it was in the proper position but just couldn’t get a good connection (the whole reason for this problem I hope).
Thanks again for this article!
Hi there
I’ve been trying to connect the back of my D70 back to the body. But I just cannot get that ribbon cable at the bottom back into the connector. The connector is ‘open’, but there is just so little length to play with on that cable… I can get it into the connector, but not far in enough it seems, as when I shut the connector, there is too much cable outside the connector, and the back panel of the camera won’t function. Any hints on this very fiddly bit? Did you use any special tools?
Thanks!
Hi Stephan!
Kudos for your excellent repair guide!
My D70 recently has developed the same habit in displaying “CHA” when I least expected/needed it. Sometimes ejecting/reloading the CF card helped, sometimes just switching the camera off/on was enough. I once managed to provoke the error by simply changing lenses. Happened with different CF brands (SanDisk, Transcend) and sizes.
Facing a potential repair bill in the 150 Euro range, I finally digged up the PH00 screwdriver and my set of tweezers from my toolbox and began (with shaking hands, however) replacing the CF unit according to your excellent howto.
A replacement part (incl. preattached flat film/foil cable) was in stock at my local Nikon dealer (http://www.nikon-muenchen.de, very recommendable) for around 50 Euros.
For somebody not completely untalented with tiny parts and some patience, this is a pretty simple and straightforward thing to do.
I’d also like to add some of my findings:
1) Under no circumstances remove the preattached flat-film/foil cable from the new CF unit. It is unnecessary (you can tweak and bend it a little while inserting the module) and implies a potential loose contact hazard.
2) The new module doesn’t come with the metal tab (you didn’t forget about the little spacer, did you?) so you have to salvage it from the old one. PH00 screwdriver works fine here. As Stephan said: Take care not to pinch any wires – the module should slide in with close to no force.
3) My make of the D70 hat some adhesive tape stuck to the ribbon cable connector for the CF module. This obviously to prevent it from coming loose. Keep that tape and reattach it after the job.
4) Both connectors (towards CF-module and towards back panel) of my model were of the “slider” type. Make sure to insert the cable into the black part (it has a slot) since it can easily go underneath where it has no or poor contact.
5) The foil cable that comes from the back panel is indeed very short. I had good results inserting/guiding it in from the to of the camera and closing the slider from the bottom going in a crisscross pattern with a tiny screwdriver. Attaching some adhesive tape here couldn’t hurt.
6) After reassembling everything (use a blower to clean the internals) I noticed, that the same CF card went in with a much tighter fit. Seems that there was indeed some wear at the pins though none of them was bent.
Moral: Don’t throw away a perfectly good camera if you can repair it for little money.
HTH,
Volker
Hello,
Would this work for D100 as well?
Where could one buy a new CF unit?
Thanks!
-brt
Presumably a similar procedure should work on the D100. I haven’t looked inside one, so it’s hard to tell if it can be disassembled as easily. As Volker mentioned in the previous post, he was able to get a new CF unit from his local Nikon service center.
Good luck!
Hello,
I asked at http://www.nikon-muenchen.de and have CF unit for D100 in stock and it costs 39.60 plus postage and VAT.
Once I got this at home, will recheck the manual. Hope it will work for the D100 as well.
Regards,
-brt
Hi Bert!
I’m pretty sure that almost the same procedure will work with your D100. Maybe even the same module is used!
You should, however, verify that you know which screws have to be loosed to remove bottom and back covers. With my D70, four of them won’t come off easily since they hold the tripod mount plate and probably have Loctite on them.
If I’m right, your D100 has a metal alloy body, so there might be additional seals where the D70 only has Z-shaped overlaps.
While talking about taking apart your cam: While I was at it, I also lifted the top/front cover a little (for the front cover you also have to remove the AF/MF switch that has a screw behind its sticker) and cleaned the LCD that had some lints under its cover with a bulb blower.
Of course, this is nothing for the faint hearted, but hey: I have a “good as new” cam now.
One week in Tokio and another in Venice, >1000 exposures and not the slightest sign of a failure. I think, I permanently fixed it.
Greets,
Volker
Hallo, bei der D100 ist es nicht so einfach den CF-slot auszubauen. da Hier der Slot auf einer Kunststoffhalter aufgesetzt ist. Auf der anderen Seite bfindet sich noch eine kleine Platine die vermutlich für die Blitzsteuerung zuständig ist. Die Kabel sind sehr Kurz so das ich das Gehäuse weiter öffnen musste d.h. vordere Abdeckungen und obere Abdeckung mussten demontiert werden. Auch die Platine die unten sitzt im Sockel musste raus um an das Flachkabel ranzukommen. Erst dann kann man vorsichtig den CF Schacht ein wenig herausziehen um dann die Schrauben der aufgesetzten Platine lösen zu können. Erst dann kann der CF-Schacht entnommen werden. Ich hoffe ich bekomme den Boddy wieder zusammen und alles funktionier wieder.
PS. Vermutlich ist bei der D70 das alles besser durchdacht da diese Kamera 2 Jahre jünger ist und der Nikon Service selbst festgestellt hat wie besch… es ist den Kartenslot zu entfernen. Viel Spaß beim “Basteln” und viel viel Glück.
Seems like it is a very common problem…But try calling Nikon and they seem they never heard of it.Before taking it apart for those of you that are not as patient with small parts like me. Try going to your local Radio Shack and Buying some Head Cleaner…This was use for Audio and Video heads to clean their counterparts. I used an old 256 mb card and poured it into the holes and then repeatedly put it in the card and out about 20 times ….I then used some pressurize canned air (also at Radio shack or office supply store)to dry it off…works fine now…Hope this helps
Hi, Thanks for all the great info – its just what i need. Do you have a Nikon part number for the card reader assembly (for D70) please as i am trying to locate one in the UK to fix my camera
Hey – being faced with having the odd cha error on my D70, I’d like to eventually try this method – sadly it appears that the images are all gone…
Is there any way to recover them?
I tried to repair my d70 before I found this article and wound up breaking the little lock piece that connects to ribbon from the CF assembly to the board of the camera. Does anyone know the name of that little black piece? I tried asking Nikon, but the person had no idea and kept suggesting I send my camera to Nikon for repair.
Sorry about the broken pictures – I’ve recently moved to a new server, and the links to the old image gallery broke. All images are back online now though, so they should work as before…
Anthony – as far as I know the lock itself cannot be purchased separately, and you’ll have to get the complete connector. But with a little luck it may be possible to detach the lock from a new connector and transplant it. My best guess would be to take the PCB (or the entire camera) to a store specializing in electronics components. The part you are looking for is an FPC/FFC connector. Good luck!
Hi,
I followed your tutorial on how to fix this problem, but instead of fixing the pins, I changed the entire CF unit. I put the camera together before screwing everything back to place, tried all the buttons and it worked perfectly. However, when I tightened the screwes, the camera would not turn on. Very strange. Any ideas?
Hard to tell – if it worked just fine before you put it back together, I’d guess that one of the ribbon connectors may have been dislodged as you were putting the case together.
Hi all,
I just wanted to thank you all for your great advices.
Special thanx to Stephan Mantler for the amazing tutorial.
I ordered the board at http://www.nikon-muenchen.de and replace it today.
My D70 (who did lots of CHA and ended with -E- even with a CF in) is now working like a charm for 72€ (VAT + Port included).
Cheers from France ;o)
Hey Stephen, thanks for the guide. It was incredibly fiddly, but it worked. However, I think there are a couple of places where I’d do things slightly differently to you were I to do it again. This might help others avoid the problems I had.
Firstly, when disconnecting the back panel’s ribbon connector, it’s far easier and safer to flip up the hinged black connector on the bottom panel rather than pulling down the side clips on the back panel connector. Both side clips snapped on the back connector and while I’ve got everything back together and working I’m worried that the ribbon will work free now that it isn’t properly held in place.
Secondly, you went a bit fast for me regarding the disconnection of the ribbon connector for the CF card holder. A couple more photos would have been helpful here. Again, I mistakenly disconnected the clipped connector on the bottom panel rather than the hinged connector on the CF card holder itself. In hindsight I can see that this was what you meant but at the time it wasn’t clear.
Anyway, thanks so much for the guide and I hope these constructive comments are useful; in any case, you just saved me from a very expensive upgrade!
Wow, these instructions were awesome! I ordered a new CF module from here: http://www.uscamera.com/1c998-634.htm Cost me $54.80 with shipping.
I have a couple of comments on the instructions:
1) My new CF module came with a ribbon cable attached, but I didn’t use it. I disconnected the old CF module by raising the black connector tab on the CF module connector. I tried but was not able to re-insert the cable on the new CF module and get the black tab closed. So, I took the orange tape off the camera bottom connector and CF ribbon cable, and used the slide connector mechanism to disconnect the CF ribbon cable from the bottom of the camera. I then attached the ribbon cable to the CF module, put the CF module in place, and then reconnected the ribbon cable to the bottom of the camera. Much simpler, IMO.
2) I tried and tried, but couldn’t get the ribbon cable connected to the back of the camera. Maybe I don’t have enough patience, but I don’t think I was ever going to get it. So, I disconnected that cable from the bottom of the camera using the lift up black tab. I connected it to the connector on the camera back, put the camera back in place, and then reconnected the camera back ribbon cable to the camera bottom.
If you test it and get the F– error – don’t panic! Make sure you have a lens on! 🙂
I wish I could submit photos to help illustrate what I was doing with the ribbon cable, but my camera was out of order at the time…
Thanks for the excellent procedure! Worked very well. Ran into the “no video” issue, just had to go back and seat the cable properly. Camera works great now, just in time for Halloween!
Hi,
thanks a million for the detailed description of the repair. I ordered the part from Nikon Munich (70 €). Key problem with my D70 was that I couldn’t get all the screws out of the camera. Especially the ones on the bottom where a nightmare to remove. The heads were so soft that after giving it a try, you couldn’t put any force against the screw anymore. Well, as you have to remove the bottom part of the cam, I finally got my electric drill and more or less carefully removed the bad screw… I must say that my blood pressure went up quite high during that procedure… After the screw was removed, I did as described by Stephen’s fantastic How-To and put everything back together. I wouldn’t have bet any money after this, that my cam will ever come back to life again – but guess what -> it did and it is working again wonderfully. No more stupid CHA errors, no more lost pictures… Stephen, thanks a million for your excellent How-to…
Kan iemand mij vertellen hoe ik het Vergrendelings scherpstelselectieknopje kan vervangen.
Nice article. It lead me to spraying my pins with contact cleaner and cleaning them up first. The CHA error is gone.
Pat, good to hear it worked out so easily for you!
Thanks for the good tips!
Hi Stephan,
Thanks so much. After 2 years of non usage, I took out my D70 popped out the card and popped it back in again and got the dreaded CHA error, tried the easy stuff to no avail. I then took the body apart and found what looks like manufacturing defect in the card reader. The soldered end of a middle pin was not soldered properly and was disconnected. Ordered the replacement part and used its own ribbon cable which was much easier to connect the bottom panel connector. After two failed attempts I took the advice regarding the cable from the back to the bottom panel. I disconnected it from bottom and connected it to the back panel, then fed it through to the bottom panel connector – much easier. Works like a champ!!!
Thanks again!!
[…] Nikon D70/problemen met geheugenkaart Openvijzen en CF kaart kabel vastduwen. Zie bv hier: http://www.stephanmantler.com/blog/d70s-camera-repair/ (Enkel van onder is […]
Just used these instructions to replace the CF card assembly in my D70. The part was $50, so it saved me $200 in repair charges. Thanks!!
I have to a say a massive thanks for this guide. My D70 has been sat doing nothing for the last 12 months because of the CHA problem and missed a couple of important family events. For some reason I had it in my head today I was going to fix it and thanks to your guide, I have!
A couple of things that didnt immediately click were the CF panel ribbon slide down clip was easy but not immediately clear from your one line and red box on the image. I made the mistake of unclipping the ribbon on the base of the camera… fortunately it went back in and I realised where you meant.
The other was again my poor reading and I spent 10 minutes swearing at the body with the base in place whilst trying to needlenose that ribbon back in… once I realised it is MUCH easier without the bottom on as you stated, it went back in and the screen came on first time!
Again dude, many many thanks for the guide. I have my D70 back! 🙂
[…] D70s hat langsam aber sicher ihre Rente verdient weil sie zusehends altersschwach geworden ist (CHA-Error und Sensorrauschen). Dazu gab es dann passend das AF-S 50mm f/1.4G. Vorsicht falls sich jemand die […]
So is this procedure to be used any time the D70 is sporadically doing the CHA thing, or should I try to visually confirm first that there’s something wrong with the pins in the CF slot? A long time ago I nudged one of the pins back into place with a long jewelry screwdriver, and that worked for a few years – I don’t remember what error code I was seeing back then but now CHA is back for me. I need to get a good look at the pins I think to see if any are bent.
Mine has been working fine ever since, so I’m not really sure how to go about repeat offenders – but since the procedure generally seems to fix most of the problems related to the CHA error, I’d say it’s a good bet to try to get a look at the pins (either from outside or by dissassembling the camera) and either nudge them back or replace the CF card assembly yourself.
Good luck!
– stephan
Hi Stephan,
I read all comments in the discussion, and I couldn’t decide whether I need to order both the “pin module” and the “slot module” as they are described in the Canon catalog for my EOS Rebel XT.
My problem: one pin is broken in my CF card socket, but I don’t know if I can simply replace the pin module or no.
Thanks in advance!
Cecile
Hi Cecile,
Sorry, but for the Canon Rebel I’m not sure about the correct terminology or procedure either. I guess your best bet would be to bring it to a Canon service center and see if they can assist you in getting the correct replacement parts, even if you’re going to do the repair yourself. The Nikon service centers seem to be quite helpful in this respect, and I guess Canon won’t be much different.
Good luck!
Please use a grounded wrist band and an anti-static mat when opening such a sensitive instrument. Especially in the winter. Static discharge from your fingers could destroy the camera instantly or do damage that won’t show up until later down the road.
[…] het knopje volledig reinigen denk ik. Hier vind je uitleg over hoe je een D70 moet openschroeven: http://www.stephanmantler.com/blog/d70s-camera-repair/ Het is wel opletten met die connectors, de ene moet je openschuiven en de andere openklikken. Veel […]
Das funktioniert!
I did this procedure but I still do no have much access to the pins or at least not enough for somebody as clumsy as me…
Yeah, it requires quite a bit of fiddling and patience. I purchased thin needle-nose pliers at my local hardware store, and they definitely helped. But the good news is if you’ve come this far, even if you can’t realign the pins at least you could also replace the entire CF module by yourself.
thanks for the tips, it was a scary procedure but it was a success! more power to you.
Thanks Steven saved me a lot of grief.
When I got the CF unit out I discovered that 10 of the surface mount connections on the circuit board had failed. This is the connection between the CF connector and the circuit board. This is difficult to see without a microscope or 10X magnifiers. (The solder around the base of the pin will have a tiny crack and the pin will deflect if pushed GENTLY with a tiny screw driver) This is a manufacturing defect caused by not getting the solder hot enough to fully melt. This defect probably accounts for many of the repeat offenders and intermittent failures. For most people the only option is replace the unit. However if you have a very fine tipped soldering iron, a jar or tube of jelled flux, flux cleaner (acetone or rubbing alcohol will also work) very good eyes, and a steady hand this can be repaired
Here is what I did.
1. Use a small paint bush to put the jelly flux on all the pins.
2. Very carefully touch the soldering iron tip at the junction of the pin and the pad on the circuit board. This will cause the flux to clean up the junction and will re-melt the original solder. Do this to all the pins. (Although all the pins may not appear broken they are probably weak because of the bad manufacturing.)
3. Clean up the circuit board with flux cleaner, acetone or rubbing alcohol.
First WARNING: Do not touch more than one pin at a time. This could cause the solder to bridge across the two pins. If this happens it will be necessary to use solder wick to remove the bridge.
Second WARNING: Do not attempt to put more solder on the connection. The original manufacturing process put enough solders on the junction)
Thankyou so much, it really helped alot!!
Hi. I get the CHA error lately, so I looked inside at the CF pins. Two pins were shorter than the others . . . but another two are longer. The center two are longer, the lower left and upper right are shorter. I looked at my card reader as an example, and it shows the same odd pin lengths. I can’t imagine why the lengths are different, but it appears to be part of the design. So . . . this is not the explanation for the CHA problems . . . oh well. But maybe, as in Russell Gunn’s case, I should look at the pin soldering condition. Thanks Russell . . . that could be a major bit of information! Thank you Stephan for the disassembly instructions.
James in Georgia
Hi, James,
the longer and shorter pins are indeed by design: the longer ones provide voltage, and the shorter ones are grounding. This way, the order in which power supply and signal lines are (dis)connected is always well defined.
Good luck with troubleshooting your camera!
Hello,please help me!
Is the repair the same with the Nikon d 80???????
Hello Chris,
it’s probably not exactly the same procedure – screw locations and ribbon connectors have probably changed, but I’d guess it’s about the same level of complexity. If you’re getting the same error and feel confident about disassembling your camera, it may be worth a try.
As I was taking the recepter out the or a copper piece fell out. It is thin and has two holes one on each end. I have no idea where to put it back in. HELP!
Andrea, check “step three” in the guide – that’s probably the piece you’re talking about. The holes should line up with the ones in the bracket, and go underneath that.
Good luck with putting everything back together!
Thank you! Great instructions for solving a problem my D70 had from almost day one! If you’re ever in S. NH, allow me to treat you to the largest ice cream sundae you can eat! Regards, ‘C’
You’re welcome!
And about that ice cream sundae, that can be arranged 🙂 Thanks for the offer!
Thanks for the great manual and suggestions. Hopefully I’ll find some time over Xmas to try this out and resolve the CHA problem on my D70.
I looked around for descriptions given by some above of the alternative method of un-hooking the backpanel ribbon cord. I stumbled on this one, which gives some good visuals with the alternative means of de-assembling the backpanel. (Only follow this up to 6th image as the rest of the instructions on this link result in a modification of the D70’s sensor filters).
http://www.lifepixel.com/ir-tutorials/nikon-d70-digital-infrared-conversion-instructions.htm
Hi Stephan,
I think you’re the one to ask, and you’re a fine fellow for sharing. My D70 is giving CHA and FOR which goes away after removing/reseating battery or CM card. It works for 10 or 20 shots then get FOR or CHA again. I don’t see any bent pins. After all your experience, and comparing notes with others, what can you predict about my problem? Looks like lots of D70s are doing this. Are there many frequent causes or do you think there is one common cause? Are the solder joints for the pins likely to fail?
I may just dive in and look anyway.
Thanks,
James
PS . . . sorry to be prolix, but in reading all the user experiences on your forum, most of the verbiage is about disassembly and reassembly, and it is not always clear what the root causes are, and correction was actually done.
For root causes I see:
* dirty pins
* bad solder joint
* whole card reader replaced (regardless of why replacement was needed?)
* bent pins? (is “bent pin” the same as “pushed back pin”?)
* pushed back pin (is the pin slipped back through the hole in the mounting board?)
* any other root causes?
Thank you for any additional insights on this disappointing Nikon Achilles Heel! If all else fails, I will “go in” and wrestle this thing to the floor, using my Nikon stereo microscope.
James